Overview
In this blog I'm going to recreate Slack using Firebase, HTML, CSS and Javascript. This is to help with the basics, so that you can create your own customized chat application with functionalities that are important and unique to you!
I have found it best to learn by watching short videos that I can pause and rewatch the parts that I found tricky and to skip over the parts that I already understand. Because this is my preference, I thought I would try to use this form to help teach HTML, CSS and Javascript.
Structure of this Post
Under each video, if there were any sites that I used, I will attach a link. Or if there was any code that I created that was not explained in detail I will paste it below.
1) Setting up Firebase
2) Getting comfortable with HTML/CSS
- a) Getting to know Bootstrap
b) Customizing your CSS
- a) Introducing the Javascript
b) Creating the Modal
c) Modifying the Modal
- a) Creating Authentication with Social Networks
b) Creating Persistent Users (onAuth)
c) Logging Out
NOTE: Please note that I am still learning as well and sometimes I do silly things. Especially if something works, it becomes a habit and some would say borderline superstition. Throughout these videos I tell you to restart your sever again and again and again every time you make a change. This is not necessary. Only when you change things in your backend do you need to restart the server. Please ignore this in this tutorial, and I will update the content in the future.
Setting up Firebase
Setting up Firebase
Links:
Firebase - a service that deals with the backend database of apps in real-time.
Chat Tutorial - the starter code of our application (we will be making it better!)
localhost:8000 - you will be using a python server to quickly run your code. It will server you code to localhost:8000.
Note: if you close your terminal window, you will have to get back into the directory that is holding your Chat Project. (for example, cd Documents/dev/UITChat and then run your python command).
Code to start your server in the terminal:
python -m SimpleHTTPServer
To stop your server, you can press cmd+c in the terminal.
Getting Comfortable with HTML/CSS
Getting to know BootStrap
The code for including Bootstrap is under this video. You can copy and paste it into your head tag of you HTML.
Links:
Bootstrap - a front-end framework that helps you build a fully responsive project, easily and beautifully.
Codecademy - a course to familiarize yourself with Bootstrap.
To slash out your code (to make it comment instead of a command) command+/
For example, in HTML:
   <!-- FIREBASE (this is commented out)-->
   <script src='https://cdn.firebase.com/js/client/2.2.1/firebase.js'></script>
Code to include Bootstrap (goes into the head tag of the index.html)
<!-- links to include BOOTSTRAP to your project-->

<link rel="stylesheet" href="//cdnjs.cloudflare.com/ajax/libs/twitter-bootstrap/2.3.1/css/bootstrap.min.css" />
<link rel="stylesheet" href="//cdnjs.cloudflare.com/ajax/libs/twitter-bootstrap/2.3.1/css/bootstrap-responsive.min.css" />
<link rel="stylesheet" href="https://maxcdn.bootstrapcdn.com/bootstrap/3.3.5/css/bootstrap.min.css">
<script src="//cdnjs.cloudflare.com/ajax/libs/twitter-bootstrap/2.3.1/js/bootstrap-modal.min.js"></script>
Note: Right now if you make your webpage smaller, it is responsive until about 700px length and then it stacks intead of shrinks together. This is because I used col-md-10. The md means medium, so it works on medium sized devices, but if it gets smaller than a medium size (ie. a tablet or a phone screen size, it will stack).

To fix it so that this doesn't stack, we should use col-xs-10 and col-xs-2. This way it can be shrunk to the smallest preportions.

Awesome! So I will fix this in my code at the end of this tutorial, but you are welcome to make all your columns extra small now so that it is fully responsive.
Customizing your CSS
Creating Authentication Part One: Front-end
Introducing the Javascript
This video is a little rough to watch, and I'm sorry! I tried really hard to make it less clunky, but it refused to cooperate. On the bright side, it is only a minute long. Please don't less this video deter you from watching the rest, I promise the other ones are much better!
Creating the Modal
Code: CSS for the Modal (in the /css/style.css):
.modal {
    position: relative !important;
    margin-left: 30% !important;
    right-padding: 100px;
    margin-top: -400px !important;
    background-color: transparent;
    width: 50% !important;
}
Modifying the HTML of the Modal
Font-Awesome Icons - an icon set that I really like
Code to include Font Awesome
<link rel="stylesheet" href="https://maxcdn.bootstrapcdn.com/font-awesome/4.4.0/css/font-awesome.min.css">
Creating Authentication Part Two: Backend
Creating Authentication with Social Networks
Creating Persistent Users (onAuth)
Logging out
Tidying Up and Next Steps
Tidying Up and Next Steps
Lastely, as a friend pointed out to me, if the webpage gets too small, the chat will stack rather than proportionally get smaller. To fix this, we should change all the col-md (mediums) to col-xs. You can double check your changes with mine below:
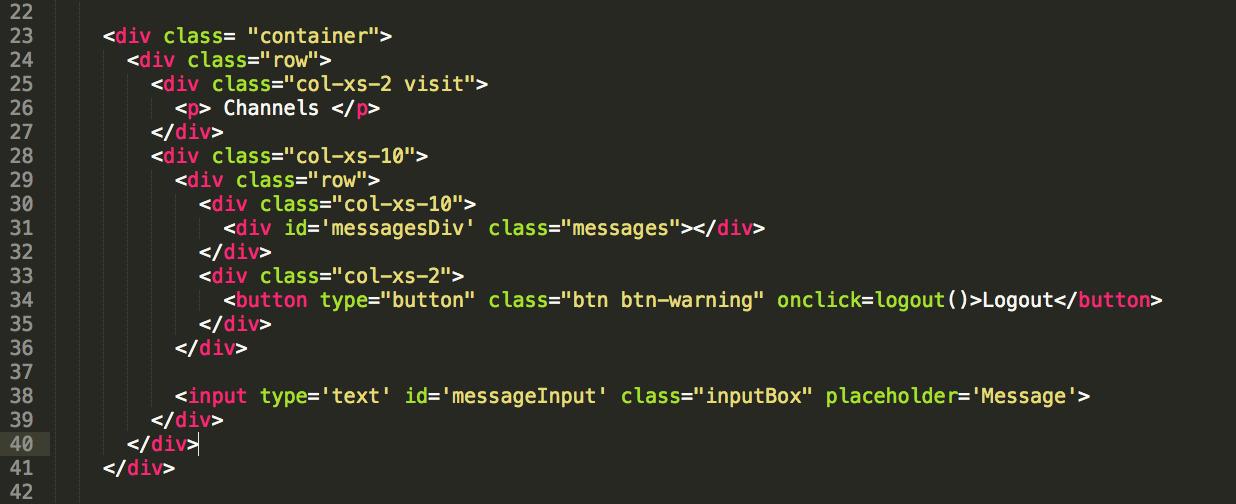
That should do it for the basics of a chat app! Next will be looking deeper into how information is saved and retrieved on Firebase and some different types of functionality we can do! Ideas for cool things we can do include (but are not limited to) Adding Channels, adding alert sounds, creating private messaging, adding emoji and "reactions", allowing files to be uploaded and shared.
comments powered by Disqus